

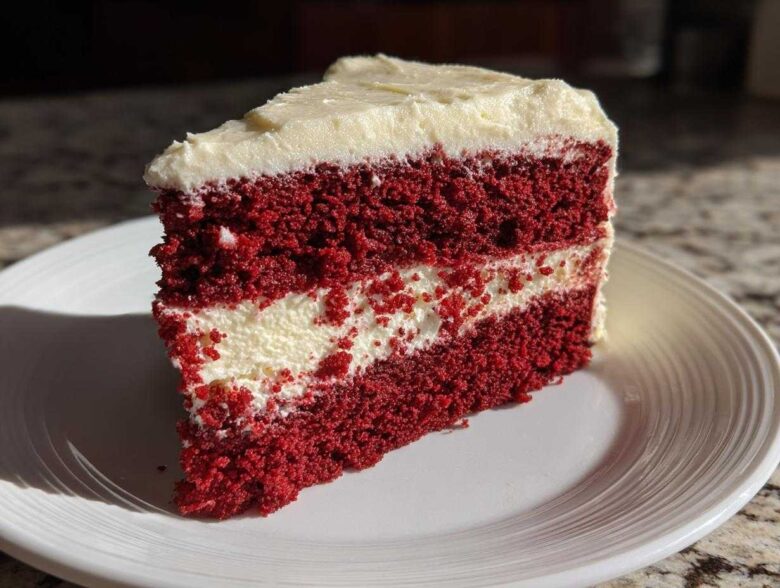
Oh my goodness, you have to trust me on this one. If you are looking for a dessert that stops everything cold at the table—I mean, truly stops people in their tracks—this is IT. Forget simple sheet cakes! We are making the ultimate red velvet cheesecake here.
What’s the secret? It marries two of the best things in the world: that slightly tangy, deep red velvet crumb texture sitting perfectly beneath a blanket of rich, unbelievably smooth cheesecake filling. It’s incredible. I always save this recipe for our busiest holidays, like Christmas or Valentine’s Day, because it just screams ‘special occasion.’ When you cut that first slice, you know you’ve nailed it. Check out my official thoughts on how we do things here at the blog too! We love sharing our best baking secrets right here.
Why This Layered Red Velvet Cheesecake is a Showstopper Dessert
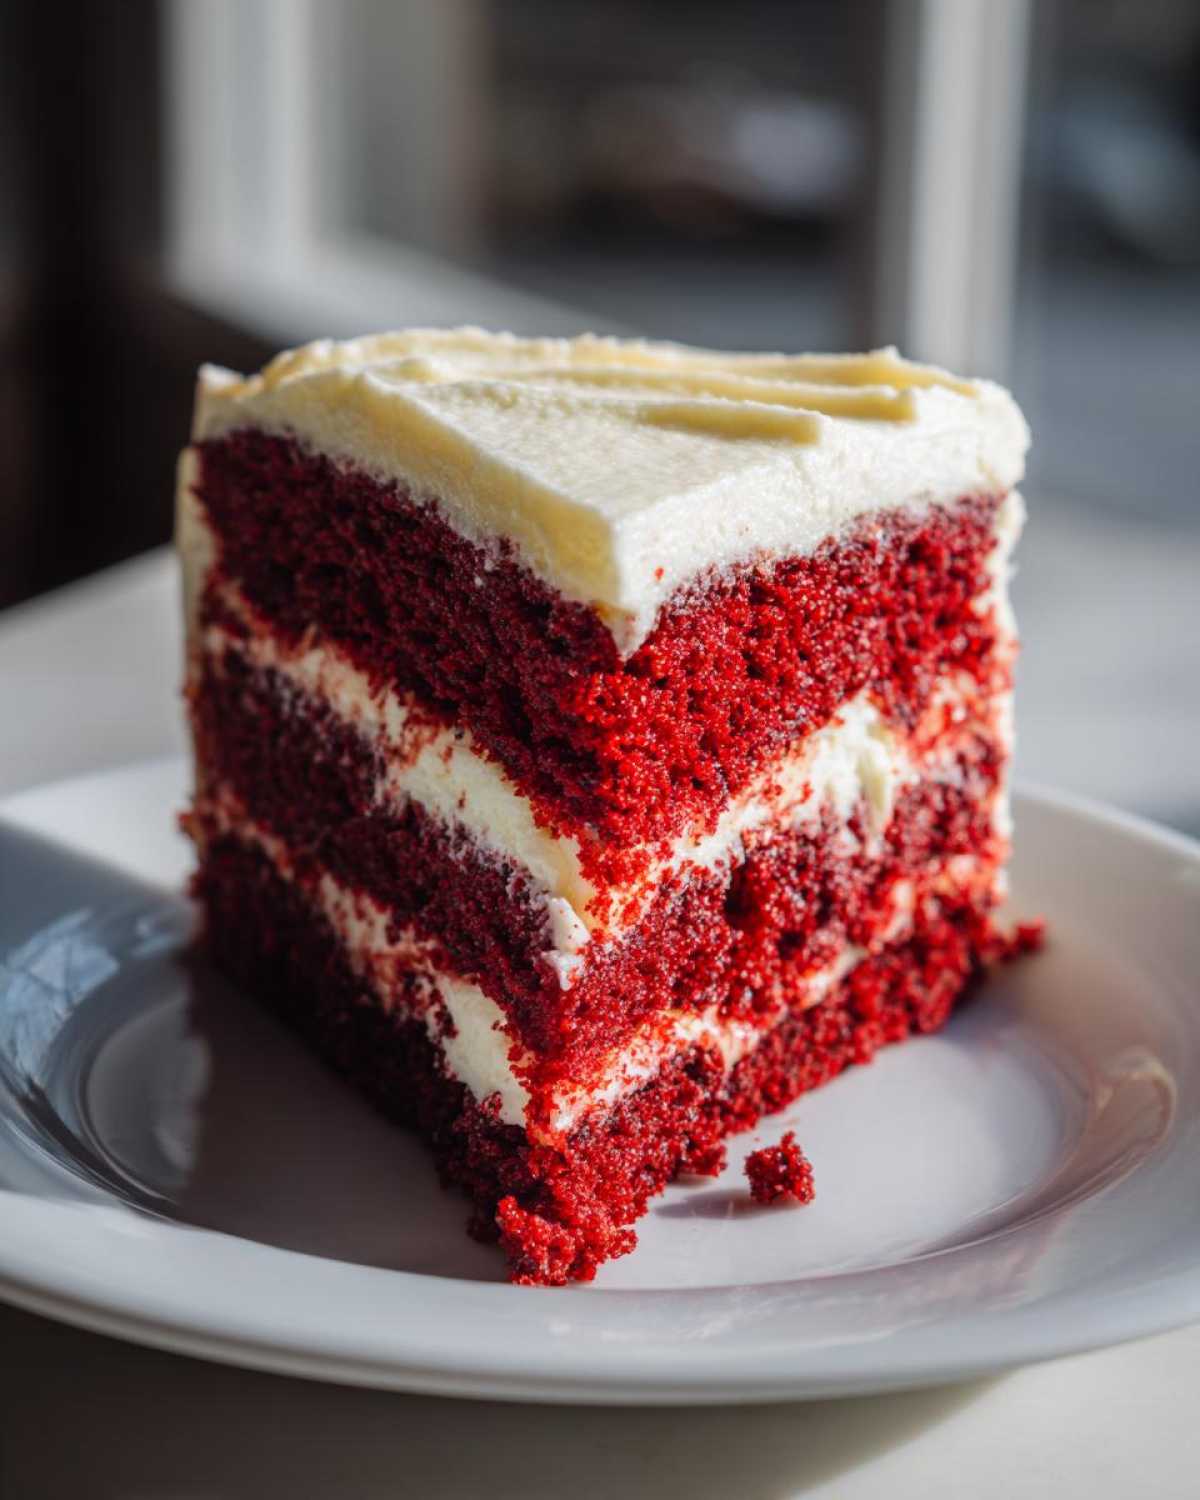
This isn’t just a dessert; this is absolutely a showstopper dessert that demands attention. The deep jewel tone of the red velvet layer beneath that pale, gorgeous cheesecake filling makes it instantly impressive. It’s the definition of a decadent dessert, and honestly, every time I pull this red velvet cheesecake out of the fridge, I feel like I deserve a round of applause!
Key Features of Our Red Velvet Cheesecake Recipe
- The perfect layered structure that gives the best of both cake and cheesecake in one bite.
- That amazing, vibrant red color that just pops when you serve it up for a holiday.
- The texture is unmatched—a slightly dense cake base supporting the most unbelievably smooth, creamy cheesecake filling.
- It sets up beautifully the day before, meaning less stress on the day you serve your amazing creation!
Gathering Ingredients for Your Red Velvet Cheesecake
Okay, you can’t rush perfection, and that goes doubly for ingredients! Before you even dream about mixing anything, pull out your cream cheese, sour cream, and eggs and let them sit on the counter. Seriously, room temperature is non-negotiable for that famously smooth, creamy cheesecake filling we are aiming for. Also, a big tip for the color: skip the liquid food coloring if you can find the gel kind. Gel gives you that super deep, vibrant red without thinning out your batter—which we absolutely cannot have in this red velvet cheesecake!
For the Oreo Crust
- 1 1/2 cups crushed chocolate sandwich cookies (like Oreos)
- 1/4 cup unsalted butter, melted
For the Red Velvet Cake Layer
- 1 1/2 cups all-purpose flour
- 1 teaspoon baking soda
- 1/2 teaspoon salt
- 1 tablespoon unsweetened cocoa powder
- 1 cup granulated sugar
- 1/2 cup unsalted butter, softened
- 2 large eggs
- 1 teaspoon vanilla extract
- 1 teaspoon white vinegar
- 1 cup buttermilk
- 1 tablespoon red food coloring (gel preferred!)
For the Creamy Cheesecake Filling
- 1 (8 ounce) package cream cheese, softened
- 1/2 cup granulated sugar
- 1/4 cup sour cream
- 1 teaspoon vanilla extract
- 2 large eggs
For the Cream Cheese Frosting Topping
- 1 cup powdered sugar
- 2 tablespoons milk
- 1 teaspoon vanilla extract
Step-by-Step Instructions for the Best Cheesecake Ever
I always say that baking this red velvet cheesecake is a bit like building a beautiful, delicious layer cake, but you get that unbelievable creamy center! It takes a little time—please don’t rush the cooling, or you’ll be very sad—but the steps themselves are super straightforward if you follow the order. We’re getting those three distinct layers just right: the crumbly crust, the velvety cake, and that rich cheesecake on top. This is where we really earn that title of the best cheesecake ever, so put on some music and let’s make this happen!
Preparing the Crust and Cake Base for Your Red Velvet Cheesecake
First things first, pop your oven up to 350°F (175°C) and get that 9-inch springform pan greased up. For the crust, just smash those Oreos up—food processor makes it easy, but a plastic bag and rolling pin work if you want a little more arm workout! Mix the cookie crumbs with the melted butter and press that mixture down *firmly* onto the bottom of the pan. Give it an 8-minute head start in the oven, then let it cool a touch.
While that’s happening, whisk your dry cake ingredients (flour, soda, salt, cocoa) separately. In your main bowl, cream that softened butter and sugar until it looks light and fluffy—I use my electric mixer here for speed! Beat in your eggs one at a time. Now, mix up your buttermilk with that vibrant red food coloring; it needs to be a uniform shade of dazzling red. Alternate adding the dry mixture and the red buttermilk into the butter mixture, mixing gently until everything is *just* combined. Pour this beautiful red velvet batter right over your slightly cooled crust.
Creating and Layering the Creamy Cheesecake Filling
Now for the luxurious part! Make sure your cream cheese is super soft; no lumps allowed if you want that truly creamy cheesecake filling. Beat the softened cream cheese with the 1/2 cup of sugar until it’s totally smooth, then mix in the sour cream and vanilla. Beat your two eggs in gently, one at a time, but stop mixing the second they disappear into the batter. Overmixing the cheesecake filling is what causes cracks later, so be gentle!
When it’s ready, just pour that smooth, pale filling right over the layer of red velvet batter you already have waiting in the pan. Don’t stir it! We want distinct layers here for our ultimate red velvet cheesecake experience. Don’t worry if the cheesecake layer sinks a little into the cake layer; that’s how they meld so beautifully when baked.
Baking and Cooling Techniques to Prevent Cracking
Time for the oven! Bake this whole beautiful stack at 350°F (175°C) for about 50 to 60 minutes. How do you know it’s done? The edges should look set, but the absolute center should still have a tiny, gentle wobble when you nudge the pan. This little jiggle is critical!
When it’s finished, turn the oven off completely. Prop the door open just a crack—you can use a wooden spoon handle for this—and let the cheesecake slowly cool inside the oven for a whole hour. This gradual temperature drop is your secret weapon against huge cracks! After that hour hangout, move it onto the counter until it comes to room temperature, and *then* cover it and chill it for at least four hours, but honestly, overnight makes the perfect red velvet cheesecake.
Finishing with Cream Cheese Frosting
Once your masterpiece is thoroughly chilled and smells amazing, you can whip up that simple topping. Just beat the powdered sugar, milk, and vanilla extract together until it’s perfectly spreadable. It should be soft enough to glide easily over the cold top layer.
Spread this lovely frosting evenly over the top of your chilled cheesecake. Now for the moment of truth: carefully release the sides of your springform pan. If you need a really clean slice, dip a long, thin knife into hot water, wipe it dry, and use that to cut—but do it quickly! That way, you get those clear lines and everyone sees exactly how gorgeous your layered dessert is.
Tips for Success with Your Homemade Cheesecake
Making a red velvet cheesecake sounds intimidating because it has so many parts, but honestly, I think people get worried about things that aren’t worth stressing over! The most important thing I want you to know is that technique matters way more than fancy equipment in this recipe. If you focus on getting the ingredients to the right temperature and using the right coloring agent, I promise you’ll get that gorgeous, crack-free result we love.
We want this dessert to be rich and velvety, not just sweet. Don’t be tempted to skip the vinegar either! That little bit of acid reacts with the baking soda and buttermilk to help give the cake layer its traditional slight tanginess, which cuts beautifully through the richness of the cheese layer. Trust me, paying close attention to these little details sets you up for the best cheesecake ever.
Ingredient Notes and Substitutions for Red Velvet Cheesecake
Let’s talk color one more time because it’s so key to the ‘red velvet’ payoff. I swear by using gel food coloring. Liquid coloring, even a few extra drops, can throw off the delicate balance of liquids in the cake batter, making it runny and dense. If you use gel, you use less volume, and the color saturation is intense. It’s worth seeking out!
For the dairy in the cake layer, you really need buttermilk. If you don’t have any, don’t fret! Just take your regular milk—about a cup—and stir in a teaspoon of white vinegar or lemon juice. Let it sit for about five minutes until it looks slightly curdled. That’s soured milk, and it works totally fine as buttermilk in this recipe.
As for the cheesecake filling, if you absolutely cannot find sour cream, you can substitute an equal amount of full-fat plain Greek yogurt. You’ll get a slightly tangier result, which I actually love when paired with the cocoa in the red velvet, but it works in a pinch to keep that filling silky and luxurious. Just make absolutely sure everything is room temperature before you start beating!
Serving Suggestions for This Festive Dessert Recipes
Once your gorgeous, chilled work of art is sitting on the counter, ready to be admired (and eaten!), you might be wondering how to make the whole spread feel extra special. This red velvet cheesecake is rich enough to stand on its own, but a few simple pairings can really elevate it, especially when you’re planning for big celebrations!
If you’re serving this up for Christmas or maybe you’re prepping for a romantic Valentine Day dessert, think about simple sides that won’t compete with that beautiful chocolate and vanilla flavor profile. We want bright, fresh tastes to cut through the richness!
For a simple presentation, a dusting of fine cocoa powder over the top right before serving adds drama. But if you want full effect, try pairing slices with fruit ideas. Fresh raspberries or sliced strawberries provide a lovely, tart contrast that cleanses the palate beautifully. This whole dessert screams ‘Festive Dessert Recipes‘!
If you’re going for a coffee pairing, remember this is incredibly rich. You want something strong! A rich, dark roast coffee or even a little espresso shot on the side works wonders. For an adult twist during the holidays, I sometimes make a small pitcher of raspberry coulis and drizzle that right next to the slice on the plate.
It’s so easy to make this impressive dessert even more memorable just by thinking about what goes next to it on the plate. You’ve done the hard work making the layers perfect, now just make the serving presentation shine!
Storage and Reheating Instructions for Red Velvet Cheesecake
So, you’ve managed to have leftovers of this incredible red velvet cheesecake? Good for you! You’ve got a true treasure hiding in your fridge. Now, we need to treat this beauty right so it stays perfectly creamy and that cake layer stays moist.
Here’s the non-negotiable rule: cheesecake is best served cold. Seriously, don’t even think about trying to microwave a slice to warm it up! That heat will turn your beautiful cheesecake layer into soup and make the red velvet cake layer mushy. We worked too hard for this decadent dessert to mess up the texture!
The absolute best way to store leftovers is right in the springform pan if possible, covered snugly with plastic wrap, or transferred gently to an airtight container. Try to keep it away from anything smelly in the fridge, like onions or fish—cheese absorbs odors like a sponge, and that will ruin the subtle vanilla notes!
When properly covered and kept cold, this layered creation stays fantastic for about 4 to 5 days. That’s nearly a week of grabbing a slice whenever you need a sweet treat! If you realize you won’t eat it within that time, you *can* freeze it, though I always prefer it fresh. If you freeze it, make sure the top cream cheese frosting is already on there, or cover the top layer *extremely* well before wrapping it tightly in plastic wrap and then foil. Thaw it overnight in the fridge before serving, but remember, the texture will be slightly softer than when it was first made.
Honestly, if you’ve made this the day before, just keep it chilled, covered, and ready to slice. It really is the easiest thing to store once you’ve mastered baking it!
Frequently Asked Questions About Red Velvet Cheesecake
I totally get it—when you make something this gorgeous, you want to make absolutely sure you get it right! I’ve gathered some of the questions I see most often about this recipe. Honestly, most issues pop up because of rushing the chilling time or not letting the cream cheese warm up enough. Don’t worry, we’ve all been there! Here are the quick answers I use when I’m baking this showstopper.
How long does the red velvet cheesecake need to chill?
This is the question I get asked the most! You simply cannot rush the chill time on a layered cheesecake like this. While the recipe calls for a minimum of four hours, truly, overnight is where it shines. When you chill it overnight, the cheesecake layer firms up perfectly, and the flavors in the red velvet cake layer actually deepen and meld with the cheese—it gets so much better! If you try to slice it before four hours, I promise it will collapse into a wonderful puddle, but it won’t look like the beautiful layered slice you want.
Can I make this layered cheesecake without the cake layer?
Oh, you totally *could*, but then you’re just making a really pretty, chocolate-y cheesecake, right? The whole magic of this recipe is the contrast! The slightly denser, cocoa-infused red velvet layer acts as the perfect grounded base for that light, tangy cheesecake filling. It’s the unexpected combo that makes it a showstopper dessert! If you really only wanted cheesecake, that’s fine, but you’d be missing out on the signature flavor blend this recipe offers. I highly recommend sticking to the layers unless you are trying to create a very light, no-bake version (which is a totally different recipe!).
What is the best way to get a smooth, creamy cheesecake filling?
Okay, smooth is the name of the game here, and it all comes down to two things! First, the ingredient temperature—I cannot stress this enough: your cream cheese, sour cream, and eggs must be fully at room temperature. If ANYTHING is cold, the cream cheese will form little hard lumps when you try to beat it. Second, we keep the mixing gentle once the eggs go in. Once those two eggs are added, switch to a low speed and mix just until you see the mixture become uniform. If you beat it hard trying to incorporate air like you would for a pound cake, you introduce too much air, which causes it to rise too quickly and then deflate and crack during cooling. Gentle mixing equals that gorgeous, creamy cheesecake filling!
If you ever have trouble with recipes or need to know more about our site policies, check out our official privacy policy page. Happy baking!
Nutritional Estimate for This Decadent Dessert
Now, let’s talk numbers. I’m not going to lie to you: this red velvet cheesecake is pure indulgence. It’s a layered, creamy, supremely decadent dessert, so it’s certainly not ‘light’ fare! But knowledge is power, right?
What I’ve put together below is a general estimate per slice, based on using the standard ingredients listed for a 12-serving cake. This really helps when you’re planning a holiday menu or just curious about what you’re enjoying! But please remember, this is just a guideline. Your exact measurements, the brand of cream cheese you use, or even if you decide to drizzle extra frosting on yours will change things just a bit. We always try to keep the data accurate over here on the site, but for the official lowdown, you can always check out the full site disclaimer if you have strict needs!
- Serving Size: 1 slice
- Calories: Approximately 450
- Sugar: Around 45g (It’s a celebration cake, after all!)
- Fat: About 28g
- Protein: Roughly 7g
- Carbohydrates: Near 48g
See? Worth every single, glorious bite! Don’t let the numbers scare you away from making this showstopper for your next celebration.
Share Your Baking for Celebrations Experience
Wow, you actually did it! You tackled the layers, managed the chilling time, and now you have the most magnificent red velvet cheesecake sitting in your fridge, ready to impress everyone. I feel like a proud kitchen parent right now!
Now that you’ve experienced making this showstopper dessert, I really, really want to hear about it! Seriously, drop everything and tell me how it went. Did the cream cheese layer stay perfectly smooth? Did your family gasp when you brought it out for your celebration?
Head down to the comments section below and leave a star rating—it helps other bakers know this recipe is solid gold! Tell me your little victories or any minor hiccups you had; we are all learning together here. I read every single comment, and I love seeing your beautiful creations!
And please, please, please take a picture! Snap a photo of that perfect slice showing both layers and tag me on social media. Tagging helps other people find this amazing recipe, too, so you’re sharing the joy of great baking! Go on, the cake isn’t going to eat itself!
PrintClassic Layered Red Velvet Cheesecake
A rich, layered dessert combining a moist red velvet cake base with a smooth, tangy cheesecake filling, topped with cream cheese frosting.
- Prep Time: 30 min
- Cook Time: 60 min
- Total Time: 90 min
- Yield: 12 servings
- Category: Dessert
- Method: Baking
- Cuisine: American
- Diet: Vegetarian
Ingredients
- 1 1/2 cups crushed chocolate sandwich cookies (like Oreos)
- 1/4 cup unsalted butter, melted
- 1 1/2 cups all-purpose flour
- 1 teaspoon baking soda
- 1/2 teaspoon salt
- 1 tablespoon unsweetened cocoa powder
- 1 cup granulated sugar
- 1/2 cup unsalted butter, softened
- 2 large eggs
- 1 teaspoon vanilla extract
- 1 teaspoon white vinegar
- 1 cup buttermilk
- 1 tablespoon red food coloring (gel preferred)
- 1 (8 ounce) package cream cheese, softened
- 1/2 cup granulated sugar
- 1/4 cup sour cream
- 1 teaspoon vanilla extract
- 2 large eggs
- 1 cup powdered sugar
- 2 tablespoons milk
- 1 teaspoon vanilla extract
Instructions
- Preheat your oven to 350°F (175°C). Lightly grease a 9-inch springform pan.
- Prepare the crust: Mix the crushed cookies and 1/4 cup melted butter. Press the mixture firmly into the bottom of the prepared springform pan. Bake for 8 minutes. Set aside to cool slightly.
- Prepare the red velvet cake layer: In a medium bowl, whisk together the flour, baking soda, salt, and cocoa powder. Set aside.
- In a large bowl, cream together 1 cup sugar and 1/2 cup softened butter until light and fluffy. Beat in 2 eggs one at a time. Stir in 1 teaspoon vanilla extract and vinegar.
- In a small bowl, mix the buttermilk and red food coloring until the color is uniform.
- Alternate adding the dry ingredients and the buttermilk mixture to the butter mixture, beginning and ending with the dry ingredients. Mix just until combined.
- Pour the red velvet batter over the cooled crust in the springform pan.
- Prepare the cheesecake filling: Beat the softened cream cheese, 1/2 cup sugar, sour cream, and 1 teaspoon vanilla extract until smooth. Beat in 2 eggs one at a time until just incorporated. Do not overmix.
- Gently pour the cheesecake filling over the red velvet batter layer.
- Bake at 350°F (175°C) for 50 to 60 minutes, or until the edges are set but the center still has a slight jiggle.
- Turn off the oven, prop the door open slightly, and let the cheesecake cool inside the oven for 1 hour. This prevents cracking.
- Remove from the oven and cool completely on a wire rack. Then, chill in the refrigerator for at least 4 hours, or preferably overnight.
- Prepare the frosting: Beat the powdered sugar, 2 tablespoons milk, and 1 teaspoon vanilla extract until smooth and spreadable.
- Spread the cream cheese frosting over the chilled cheesecake before serving. Remove the springform ring carefully.
Notes
- Use gel food coloring for the most intense red color without thinning the batter.
- For a smoother cheesecake filling, bring the cream cheese, sour cream, and eggs to room temperature before mixing.
- If you prefer a cleaner slice, run a thin knife dipped in hot water around the edge before releasing the springform pan.
Nutrition
- Serving Size: 1 slice
- Calories: 450
- Sugar: 45g
- Sodium: 300mg
- Fat: 28g
- Saturated Fat: 17g
- Unsaturated Fat: 5g
- Trans Fat: 0.5g
- Carbohydrates: 48g
- Fiber: 1g
- Protein: 7g
- Cholesterol: 110mg