

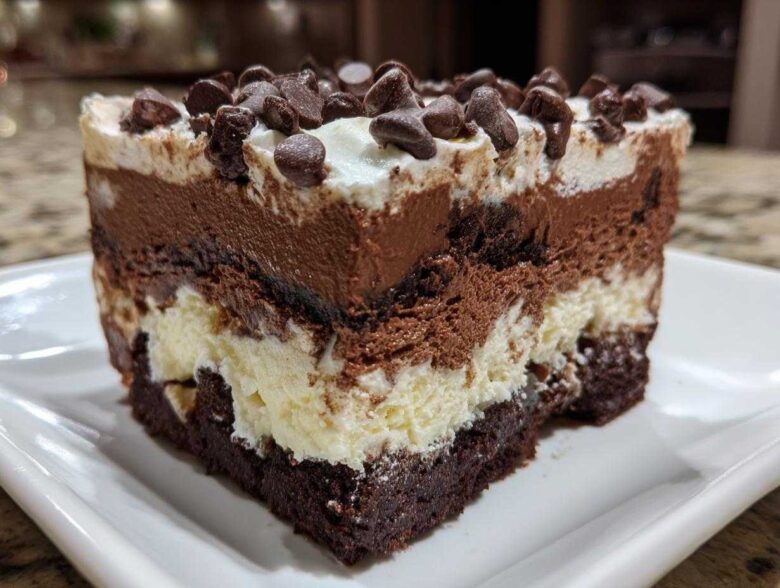
Listen, I get it. Sometimes you need something incredibly rich, something that screams “decadence,” but the thought of turning on the oven in July just makes you sweat. That’s why you need to stop whatever you’re doing and pay attention to my secret weapon: the **brownie refrigerator cake**! Seriously, this is the ultimate make-ahead champion.
I perfected this recipe after trying to bring a dessert to my cousin’s massive backyard wedding shower last year, and I needed zero oven time after the short initial bake for the base. It’s all about layering those fudgy brownie layers with dreamy, fluffy fillings, letting the cold do the heavy lifting, and waking up to pure magic. If you want a crowd-pleaser that looks like you spent all day on it but honestly took about 20 minutes of hands-on time, stick with me!
Why This Brownie Refrigerator Cake is Your New Go-To Dessert
Honestly, this dessert checks every single box when you need something fast but dazzling. Forget complicated baking; this is assembly at its finest. It’s the definition of a fantastic **No Bake Brownie Dessert**.
- This is the simplest **Make Ahead Chocolate Dessert** you’ll ever create.
- It’s rich, chilled, and uses those amazing fudgy bases we all love.
- The creamy texture rivals any fancy layered cake.
Effortless Assembly for a Rich Layered Brownie Dessert
The genius here is that we rely on pre-baked flavor. You aren’t whipping up buttercreams from scratch; you’re just gently layering fantastic components—those fudgy brownie layers—on top of each other. It’s pure engineering, but delicious engineering!
Perfect Make Ahead Chocolate Dessert for Entertaining
Because this *has* to chill for hours, it means zero fuss on the day of your party. Pull it out of the fridge and serve! This makes it one of the best **Potluck Desserts No Bake** options you can offer because it travels beautifully and stays perfectly firm.
Gathering Ingredients for Your Brownie Refrigerator Cake
Okay, time to look at what we need! The best part about this **brownie refrigerator cake** is that you can cheat a little, and I highly encourage it. Life is too short to stress over baking the base layer when the chilling part is the real star. Feel free to grab good quality, deeply fudgy brownies from the store if time is tight!
Components for the Fudgy Brownie Layers
For the bottom layer, we need that rich foundation. Remember, we need them completely cooled before they go into the pan.
- 1 box (about 18 ounces) fudgy brownies, baked according to package directions and cooled completely
Ingredients for the Creamy Chocolate Dessert Layers
This is where the magic happens! These ingredients combine for that beautifully rich, **Creamy Chocolate Dessert** experience.
- 1 package (3.9 ounces) instant chocolate pudding mix
- 2 cups cold milk
- 1 cup heavy whipping cream
- 8 ounces cream cheese, softened
- 1 cup powdered sugar
- 1 teaspoon vanilla extract
- 1 cup frozen whipped topping (thawed)
- 1/2 cup chocolate chips, for topping
Step-by-Step Assembly of the Brownie Refrigerator Cake
Alright, this is the fun part, where we move from ingredients to actual dessert structure! Since this is relying on chilling, precision in layering is key, but don’t stress too much. We want this to be quick. I usually grab my 8×8 inch pan first, line it up, and get my cooled brownies ready to go. If you need to ask a quick question about the process, you can always reach out to me here—though honestly, these steps are so straightforward, you probably won’t need it!
Preparing the Base and Pudding Layer for the Brownie Refrigerator Cake
First things first: those brownies! Make sure they are absolutely stone-cold. If they are even slightly warm, the creamy layers will melt right into them, and we want defined layers. Cut them into uniform squares or rectangles and press them tightly into the bottom of that 8×8 pan. That’s our foundation!
Next, the pudding. Whisk that instant chocolate pudding mix with the cold milk for about two full minutes—don’t stop early! Whisking activates it properly. Let it hang out for five minutes so it just starts to gain some body before we move on.
Creating and Layering the Cream Cheese Filling
In a separate bowl, beat your softened cream cheese until it’s silky smooth with the powdered sugar and vanilla. This needs to be creamy, so beat out those lumps! Then, you gently fold in the thawed whipped topping. Remember, fold, don’t beat, or you’ll knock all the lovely air out!
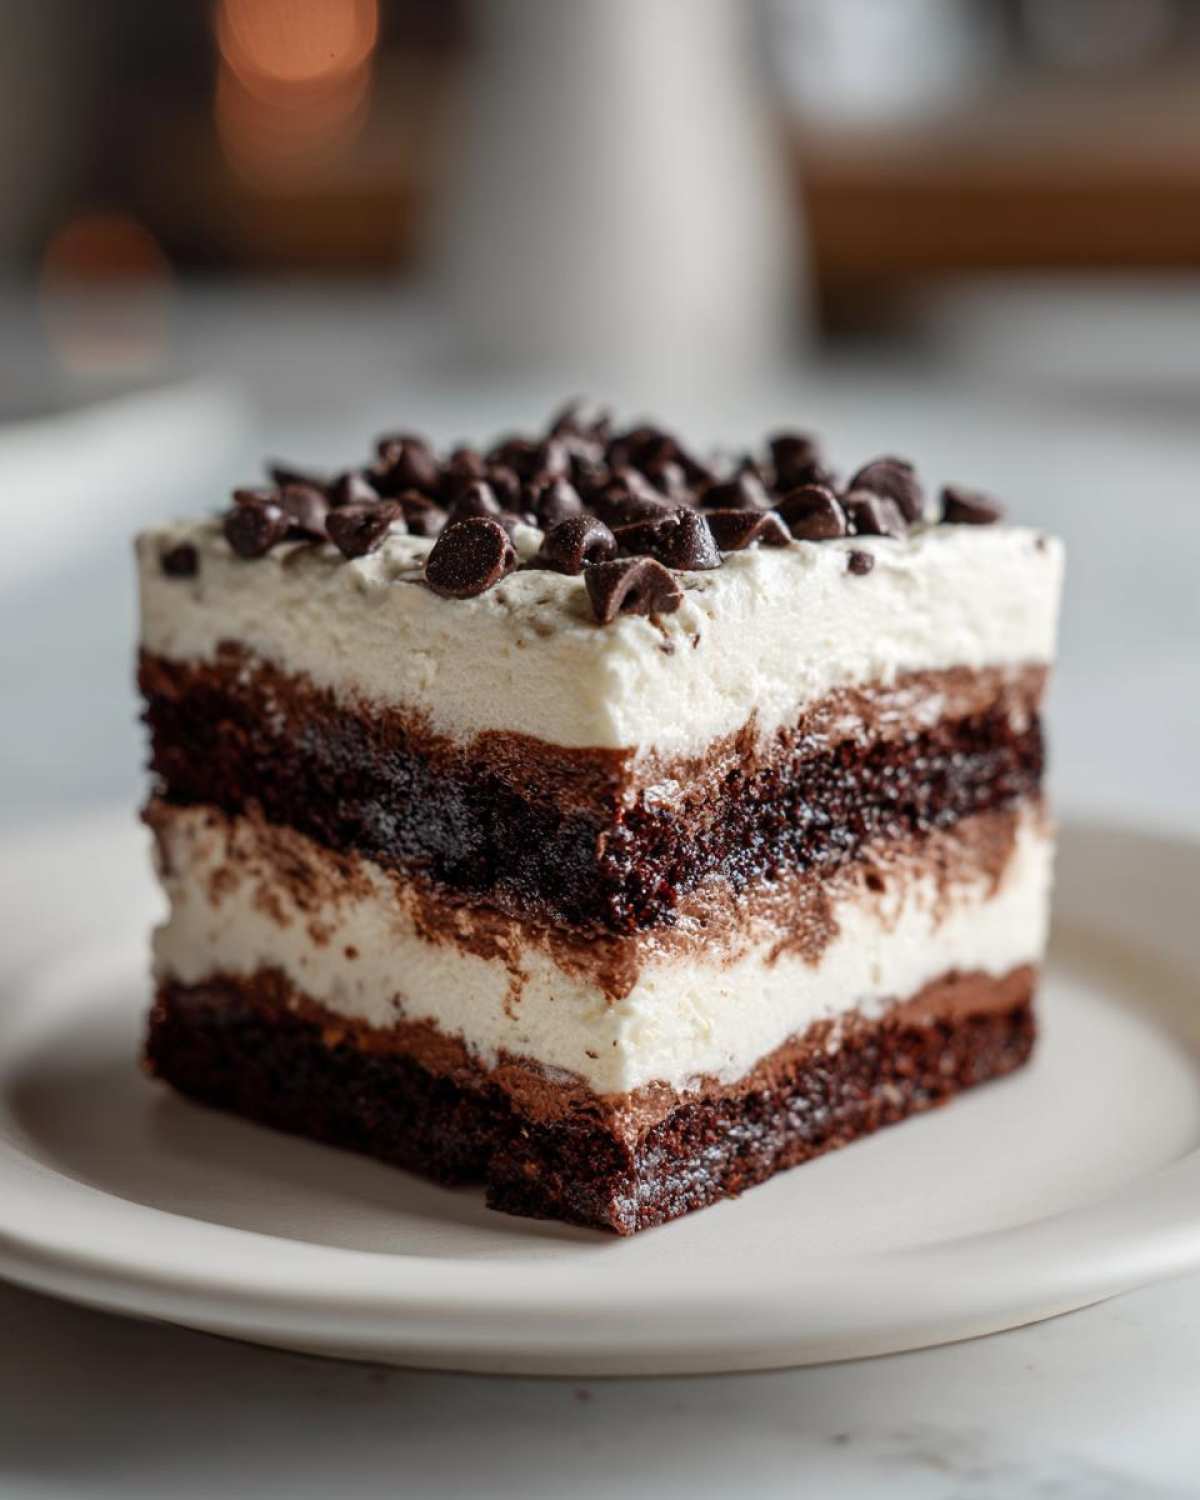
Now, we place the layers. Gently spread half of that cream cheese mixture evenly across your brownie base. Be kind to the brownies! Once that’s set, pour the prepared chocolate pudding right over the top. Smooth it gently. Finally, spread the remaining half of the cream cheese mixture on top of the pudding layer. This creates the perfect balance for our **layered brownie dessert**.
Final Assembly and Chilling the Layered Brownie Dessert
We are almost done! Cover the whole thing tightly with plastic wrap. This is the most critical step for any **Easy Refrigerator Cake Recipe**: the chilling time. I tell everyone the absolute minimum is six hours, but honestly? Overachieve! Let it sit in the fridge overnight. This ensures everything sets firmly so you get that clean slice every time.
When serving time rolls around (Step 8), just uncover it and sprinkle those chocolate chips right over the top as a beautiful, easy garnish. Slice it cold, and enjoy the easiest, most decadent **chilled chocolate cake** ever.
Tips for Success with Your Brownie Refrigerator Cake
We want this **brownie refrigerator cake** to hold its shape because nobody likes a soupy dessert, right? The key to success really boils down to temperature management and gentle assembly. Trust me, a little patience here pays off huge later when you cut into those perfect layers.
First off, that cream cheese? It needs to be truly softened—room temperature soft, not melted soft. If it’s too cold, you’ll end up with little cream cheese pebbles in your filling, and that ruins the smooth texture we’re aiming for in this **Chilled Brownie Delight**.
Achieving the Best Texture in Your Chilled Chocolate Cake
My biggest tip for avoiding runny layers, even though the recipe moves quickly, is this: Give that pudding five minutes to start setting up right after you whisk it. That slight thickening helps keep the next layer of cream cheese from sinking in too much. Also, when folding in the whipped topping to the cream cheese, use a huge spatula and just cut down the middle a few times. You aren’t trying to mix it completely smooth; you’re just incorporating it enough to keep that top layer light and airy.
And please, don’t skip or rush the chilling time! That long chill is what transforms these components into a sliceable, **Rich Layered Dessert** instead of just a bowl of glorious, messy ingredients.
Ingredient Notes and Substitutions for the Brownie Refrigerator Cake
I know everyone has different things in their fridge, and sometimes you have to make do! Don’t fear if you’re missing one little thing. The beauty of this **brownie refrigerator cake** is that it’s so forgiving, which is why it often feels like an **Icebox Cake Brownie** hybrid—easy to assemble but incredibly satisfying.
When it comes to substitutions, the fudgy brownie base is the least flexible part (we need that density!), but the creamy layers? Those you can play with!
Adjusting the Creamy Components
If you absolutely hate cream cheese, or maybe you just ran out, you have options! You can lighten things up dramatically by skipping the cream cheese/powdered sugar step entirely and just using a rich, stabilized whipped cream for both layers. You’ll need to use a stabilizer though, like a little bit of instant vanilla pudding mix added to your heavy whipping cream before you whip it up, to make sure it holds its height during the long chill.
If you prefer something slightly less sweet than the cream cheese blend, you could also use a good quality vanilla or cheesecake-flavored instant pudding mixed with the heavy cream instead of the cream cheese mixture for one of those layers. Just remember that the cream cheese is what gives the dessert that rich, decadent mouthfeel, so you’re definitely trading a little richness for lightness if you switch it out!
Storage and Serving Suggestions for Your Brownie Refrigerator Cake
Because this **brownie refrigerator cake** relies on being cold to maintain those beautiful, distinct layers, storage is super important. You definitely don’t want this warming up before the big reveal!
This cake is fantastic because it actually improves after sitting in the fridge overnight. The moisture from the creamy layers soaks just slightly into the fudgy brownies, making them even gooier and richer, which is exactly what we want in an **Effortless Chocolate Indulgence**.
Always keep it tightly covered with plastic wrap in the refrigerator. I find that if you leave it uncovered, even for a few hours, the top starts to look dry, and nobody wants a sad-looking top layer for their guests!
Serving a Crowd Pleaser Desserts
Since this recipe yields about 9 generous squares, it’s perfect for a small gathering, but you can easily double it for a huge crowd that needs perfect **Crowd Pleaser Desserts**. If you put it into a 9×13 pan, you can easily get 12 decent servings.
When you go to slice it, use a long, sharp knife run under hot water and wiped dry between each cut. This gives you those super clean lines you see in magazines! It’s my little trick for a polished presentation.
While the powdered sugar and chocolate chips are great, sometimes you want a little pop of contrast. We love serving this **Chilled Brownie Delight** straight from the cold, maybe with just a few fresh, tart raspberries scattered over the top of each plate. That little bit of acidity cuts through the richness perfectly. Or, if you’re feeling fancy, a tiny dusting of unsweetened cocoa powder right before serving makes it look professional!
Frequently Asked Questions About the Brownie Refrigerator Cake
I know when you’re bringing a **layered brownie dessert** to a big event, you want to nail the timing and ingredients! Here are the few things people ask me most about making this **brownie refrigerator cake** perfectly.
Can I use homemade brownies instead of a box mix for this layered brownie dessert?
Oh, absolutely! If you have a favorite recipe for super fudgy brownies, go for it! My main rule, which I stick to even when I’m short on time, is that those brownies must be completely, totally cool to the touch. If they are cakey or too warm, they crumble everywhere when you cut them, and the creamy layers just won’t sit right on top.
How long is the minimum chilling time for the brownie refrigerator cake?
The recipe says six hours, and yes, six hours will technically get it set enough to cut. But if you want that truly amazing, scoopable texture—where the layers are distinct but melt perfectly together in your mouth—you have to wait. I always aim for overnight. Seriously, allowing it that extra time makes all the difference for this **No Oven Chocolate Dessert**.
If you ever want to learn more about how our recipes are developed or want to get in touch, you can always check out my About Us page!
Estimated Nutritional Data for This Brownie Refrigerator Cake
Now, I have to be completely honest with you all: this is a rich, decadent, multi-layered chocolate masterpiece. It’s not exactly a salad, so the nutrition facts reflect its glorious indulgence! Because we are using packaged mixes and store-bought components sometimes, these are estimates, so please keep that in mind.
If you want to see the full breakdown or read my thoughts on diet and enjoying every treat in moderation, you can check out the official disclaimer page right here. But for the quick overview, here is what we are looking at per slice of this **brownie refrigerator cake**:
- Serving Size: 1 square
- Calories: 380
- Fat: 22g (with 12g Saturated Fat)
- Carbohydrates: 45g
- Sugar: 35g
- Protein: 5g
- Sodium: 250mg
It’s definitely an incredible finish to a meal. Enjoy every single rich, cold bite!
Share Your Brownie Refrigerator Cake Creations
Well, that’s it! We’ve assembled, we’ve chilled, and now it’s time for the best part: eating this glorious **brownie refrigerator cake**! I truly hope you loved how easy this **Chilled Brownie Delight** was to bring together without turning on the oven. It’s my secret weapon for making weekends feel instantly special.
I want to hear all about it! Did you manage to wait the full overnight chill period, or did you sneak a piece at hour five? Did you use store-bought brownies or bake your own fudgy layers? Drop a comment below and tell me what you thought!
If you make this layered chocolate dream, please snap a picture! Tag me on social media—I absolutely adore seeing your finished desserts. Seeing how perfectly those creamy layers turned out for you is the best payoff. Happy eating, friends!
PrintUltimate No-Bake Brownie Refrigerator Cake
Assemble this rich, layered chocolate dessert using fudgy brownies and creamy fillings. This cake requires no oven time for assembly and chills perfectly for parties.
- Prep Time: 20 min
- Cook Time: 35 min
- Total Time: 4 hours 55 min
- Yield: 9 servings
- Category: Dessert
- Method: Chilling/Assembly
- Cuisine: American
- Diet: Vegetarian
Ingredients
- 1 box (about 18 ounces) fudgy brownies, baked according to package directions and cooled completely
- 1 package (3.9 ounces) instant chocolate pudding mix
- 2 cups cold milk
- 1 cup heavy whipping cream
- 8 ounces cream cheese, softened
- 1 cup powdered sugar
- 1 teaspoon vanilla extract
- 1 cup frozen whipped topping (thawed)
- 1/2 cup chocolate chips, for topping
Instructions
- Prepare the brownie layer: Bake the brownies as directed on the box. Let them cool completely on a wire rack. Once cool, cut the brownies into uniform squares or rectangles suitable for lining the bottom of an 8×8 inch pan. Arrange the brownie pieces tightly in a single layer in the bottom of the pan.
- Make the pudding layer: In a medium bowl, whisk together the instant chocolate pudding mix and cold milk for two minutes until slightly thickened. Let it sit for five minutes.
- Prepare the cream cheese layer: In a separate large bowl, beat the softened cream cheese, powdered sugar, and vanilla extract until smooth. Fold in the thawed whipped topping until just combined.
- Assemble the first creamy layer: Gently spread half of the cream cheese mixture evenly over the cooled brownie layer in the pan.
- Add the pudding layer: Pour the prepared chocolate pudding evenly over the cream cheese layer.
- Add the second creamy layer: Carefully spread the remaining half of the cream cheese mixture over the pudding layer.
- Chill: Cover the pan tightly with plastic wrap and refrigerate for at least 6 hours, or preferably overnight, to allow the layers to set firmly.
- Garnish and serve: Before serving, sprinkle the top evenly with chocolate chips. Cut into squares and serve cold directly from the refrigerator.
Notes
- You can use store-bought, pre-made fudgy brownies to save time.
- For a richer flavor, use dark chocolate pudding mix.
- If you do not have an 8×8 inch pan, you can assemble this in a trifle dish, layering the components similarly.
- If you prefer a lighter top layer, substitute the cream cheese mixture with stabilized whipped cream only.
Nutrition
- Serving Size: 1 square
- Calories: 380
- Sugar: 35
- Sodium: 250
- Fat: 22
- Saturated Fat: 12
- Unsaturated Fat: 8
- Trans Fat: 0.5
- Carbohydrates: 45
- Fiber: 2
- Protein: 5
- Cholesterol: 45